Monday, February 28, 2011

CRAFTING TIP OF THE WEEK (#78) Moving Elements

Hello!

For this week's tip I thought I would share how you could give movement to certain elements on your crafting projects.

One of the things I find this concept easiest to apply to is animals.

Basically, you reassemble body parts using small brads. For instance, say you want to scrap a layout of a day at the zoo with your family. You will certainly take photos of animals while there. Why not make them more interactive by reassembling the parts on your pages to move.

When developing your photos be sure to get duplicates or if printing on your home computer print 2 of the same photo. Cut the body from one photo, set aside. Then cut the head, tail and legs from the other photo and reattach all to the body by punching holes in the photo layers at the same time with a small hole punch. Insert a brad in the the holes until your assembly is complete. Then just slide the moving parts left & right.

I love this interactive way of adding a unique and even more memorable feature to my projects.

I hope you do too.

Tune in tomorrow for tool time Tuesday.

Friday, February 25, 2011

FABULOUS FRIDAY FIND-Military Albums!

Today's find comes to us from Uniformed Scrapbooks of America.They are Albums with Military Uniform Covers.

These are not your ordinary albums though. These are fabric covered albums made to look like a folded military uniform shirt with collars and pockets where you can pin actual badges and name tags on to the front to give it the ultimate personal touch.


The attention to detail is first rate . The fact that their covers are removable is a plus.

Their current price point is: $39.99 and you have the option of customizing for an additional fee.

You can purchase themhere.

Have a wonderful weekend!


Wednesday, February 23, 2011

WHAT I'M UP TO WEDNESDAY- Wedge Treat Boxes

This week while tinkering with paper I decided to make some little wedge treat boxes.
They are great for any occasion.


*Supplies Used*
Paper- SEI (Claire)
Flowers- Crafter's Square, Dollar Tree & K & Co. (Marcella)
Gross Grain Ribbon-Michael's
Pearls & Bling- Michael's Dollar Spot

As you can see they do not take too many supplies to make and the assembly is simple.


Tuesday, February 22, 2011

"TOOL TIME TUESDAY" Tissue Tape Dispenser

This week's tool is Tim Holtz's : TISSUE TAPE DISPENSER.


This teeny tape dispenser is an adorable gadget which is but a mere 4 3/4" tall. Now you don't have to worry about searching for the invisible end of your tissue tape, just use this tape dispenser and apply. It houses a specially designed cutting blade for the tissue tape which will allow you to apply the tape with ease.

This thing is just so stinkin' cute!
It's price point is said to be: $4.99. At that price, you can't afford not to have it!

As if we needed anymore reasons to love Tim Holtz!

Hope you enjoyed this one.


Monday, February 21, 2011

CRAFTING TIP OF THE WEEK (#77) Including many SMALL photos on a single layout

Hello there!

Here's a tip that will help you include many small photographs on a single scrapbook page layout.

Do you have any round, plain, adhesive-backed ink-jet printer stickers laying around? If not, use a round punch & you will get a similar result.

If using adhesive backed ink-jet printer stickers, stamp with an image or monogram & color the image if desired. Then use your circle punch to "cut" the photos to size and place them over the adhesive side of the sticker OR you can adhere them first then cut out the excess using a craft knife.

You can then cut slots into a coordinating cardstock sheet & insert your circle photos for an interesting & unique layout, card or project.

Have a great week!

Friday, February 18, 2011

THE WINNER IS ...

SHEL WHO SAID...
I found the best cake stand at CSN:
Thomas Paul - TP42 - Ornithology Cake Stand
http://www.csnstores.com/Thomas-Paul-TP42-TMP1297.html

*****************************************************************
CONGRATULATIONS!

I will be e-mailing you shortly.

FABULOUS FRIDAY FIND-Paper Trays

Hi!

Today's find is indeed fabulous & will be extremely helpful to anyone in need of paper storage salvation.

It is the: Perfect Paper Stackable Open Paper Trays by Display Dynamics.

These are not your ordinary paper trays. These 12x12 trays are lipless. That makes it a lot easier for you to add or remove paper from the tray helping prevent tearing, bending or wrinkling of the paper. They have plenty of width between them whether you stack them vertically or horizontally. That is another great plus about owning these. They allow for vertical or horizontal storage. They are made of a clear, sturdy plastic which in turn makes it easy for you to see your paper collection while keeping them in tact.

Check out the video below:


Scrapbook.com offers them in a pack of 10 for $59.99 but at the time of this pre-post they were unavailable. Check the scrapbook.com website for availability if you are interested. They might be in by now.

Hope you enjoyed this find.

Keep crafting everybody!
Have a great weekend.

Wednesday, February 16, 2011

WHAT I AM UP TO WEDNESDAY-Tile Coasters

This week I have been busy making "Tile Coasters" among other things.
They are for my sister.
She loves anything monogrammed so I thought these would be both practical & attractive to lay out on her cocktail table.

I hope you agree.


*******Supplies Used*********

4 -Ivory Travertine-Genuine Stone (4x4)
Staz On Black Ink
Stamps (Music Sheet by Hero Arts & Monogram "T" by Studio G)
Surface Guard by Shepherd 1/2" Vinyl Bumpers for the bottoms of the coasters
Tim Holtz Sanding Block


The first photo shows medium duty felt pads but I then decided to go with the vinyl bumpers instead. I liked that they were clear & gave the coasters a little more height.
Thank you for stopping by. I hope you can come back by for Friday's find.

Tuesday, February 15, 2011

"TOOL TIME TUESDAY" DRILL PUNCH

Today's tool is brought to you by the king of crafts: Tim Holtz!

It is his: DRILL PUNCH.


This little ditty drills holes of 6" or 9" sizes into a variety of soft metals.
You simply twist one of the handles to screw the drill punch through the soft metal & you're done. You can make holes for jewelry items, holes in your paper crafting and/or home dec projects, for hand crafted binders & whatever else your imagination conceives.

It's clever design makes it so unique since it features a center balancing guide you simply twist out to make using this tool much easier.

The suggested retail price is said to be $17.99. This can be used in conjunction with all of Tim Holtz-Ideology Line of soft metals. He definitely has a lot of options.

Love it!

I will be featuring another Tim Holtz tool next week too so tune in to see what it is.


Monday, February 14, 2011

CRAFTING TIP OF THE WEEK (#76) Homemade Stickles?

HAPPY VALENTINE'S DAY BLOGGERS!

For today's tip I thought I would share how to make a homemade version of "stickles" that won't rub off your crafty creations.

I learned by trial and error that certain products work best.
Here's a list of supplies you will need:
Glitter
Glossy Accents by Ranger(use this medium for fine glitter coating)
OR
3D Crystal Laquer by Sakura (use this for chunky glitter coating)
Straight Pin
Old Paintbrush to coat the glitter on to your paper or project
Wood Stick
Recycled packaging with a deep well, paper cup or painter's palette- Basically anything that will hold your glitter/glue mixture


Instructions: Depending on the size of the area you want to coat,place the glossy accents medium or 3D Crystal Lacquer in your "dish".

Then add your glitter of choice by sprinkling into the glue or scooping it with your wood stick.

Mix the glitter & glue with your wood stick until it forms a thick paste. Place your brush in the paste then brush it evenly on the surface you want to glitterize.

Use the pin to pop any air bubbles that may form. Set aside & let it dry. Once dry, the glitter will be encased in the glue therefore staying in tact and not rubbing off. Make sure to wash your brush immediately after applying the mixture.

I am in no way discouraging you from buying Stickles. I am just sharing a way to make your own version with products you may already have on hand.

Have a "love-filled" day!

HAPPY VALENTINES' DAY!

*****I heart you all!*****

A special shout out to my honey who can't be with me today!!!


Sending you love & warm wishes.

Friday, February 11, 2011

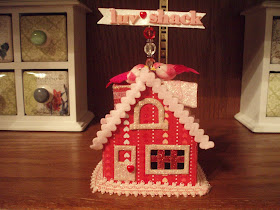
MY FIRST CHALLENGE ENTRY- The Love Shack

Stephanie over @ Always Crafting has a Whimsical Wednesdays Challenge for crafters every week. This week you can create anything!

Hers is the first challenge I have ever dared to enter.

I am breaking out of my shell & entering this little number:
The Love Shack


The photo above shows a similar chipboard house in its original state. I forgot to take a picture of the one I embellished beforehand.


*SUPPLIES USED*
Chipboard House- Craft-n-Play (Michael's)
Paper-heart paper-Target $1 spot Valentine line & pink/red glitter paper by Martha Stewart Holidays-Valentine line
E.K. Success Punch for the scalloped edges on the roof
Felt Ribbon-Craft Essentials
Pink Trim base of house-Forever in Time
Birdies-Touch of Nature
Stickles- Cotton Candy & Diamond
Jewel Pin-Creating Keepsakes
Love 3D Sticker- K& Co. Valentine line from last year
Puffy pearl hearts- Michaels
Plastic letters-Heidi Swapp
White banner-made myself w/ white cardstock & stickles

Sending you love & warm wishes.

FABULOUS FRIDAY FIND-Scrap-n-Easel

Today's find is the:SCRAP'N EASEL.
It is a 12"x24" magnetic portfolio style scrap easel. Its' two 12"x12" grids allow you to work on 2 scrapbook layouts at once.
It also folds in half for easy storage and transport.
It has a velcro style closure and can hold a half inch of 12x12 paper inside.
It will come with 16 heavy duty magnets as well as a magnetic ruler.
The grid squares on this easel will come in handy to help you measure, align and design.

This easel is slotted for a Spring 2011 release.
The sale price at the time of this post was: $59.99. Its regular price will be $79.99.
Check it out below:


Looks like this will work for lots of different crafting projects not just scrapbooking.
Hope you enjoyed today's find.

Wednesday, February 9, 2011

Liebster Blog Award & Thank You

I received a lovely surprise from a very dear & talented blog friend.
It is the LIEBSTER BLOG AWARD!


Her name is Denise @ Vintage Scrappin.

Her work is amazing & I am honored that she would think of me as a recipient of this award. There are so many talented bloggers & crafters. It is such an inspirational dimension to the love of crafting.

With that said, I am to bestow this honor to 3-5 others to bring awareness to other wonderful blogs. The Liebster Blog award is given to bring new blogs to light. It's a great way to share blogs that might not otherwise be seen or ones you want to share with others.

As a recipient you must share the love and pay it forward by:
1-Creating a post where you blog about the Liebster award & reveal your 3-5 blog picks
2-Let them know you chose them
3-Copy & paste the blog award on your blog
4-Have faith that your followers will rally & show their crafty love back out to those you awarded
5-Have fun!

Please show these lovely & talented crafters some much deserved love.
Your support means so much to them. Some days it is just the jolt they need to get their creative juices flowing.

Here are my picks:

1- Nikki @Bond Girl Creations

2- Patty @ Creative Diva 98

3- Debi @ Debican

4- Linda @ Smilin2

5-Capri @ Capri's Delights

Have a great day!

WHAT I AM UP TO WEDNESDAY-Acrylic Post It Note Holder

Here's what I have been up to this week-an acrylic post it note holder with the matching pen.


*************Supplies Used*****************

Acrylic Frame
4x6 Cardstock-K & Co./Amy Butler Sola
Ribbon-Michael's
T-Shirt Shaped Post it note-Christmas Tree Shops
Pink acrylic butterfly- bling bar from local craft store (no brand indicated)
RSVP Pen-Dollar Tree


Tuesday, February 8, 2011

"TOOL TIME TUESDAY" Project Life

Hello Bloggers!

Today's tool is somewhat of a comprehensive system more than an actual tool.
By that I mean, while it is still something tangible to make your paper crafting easier this one targets a specific goal.

A tool is defined as:a hand held device that aids in accomplishing a task.
Well this will do just that.

Are you curious yet?

With this "tool" you can simplify your scrapbooking- last time I checked that was a specific goal many of us strive for year after year. This system is going to allow you to document life in a focused, relaxed way. Deciding what supplies to use will become obsolete because that will be all done for you.

It includes a beautiful and simple, all inclusive format that can help you scrapbook anything at anytime.

It's: PROJECT LIFE 2011

View the video below by Becky Higgins who developed this wonderful system.


In my humble opinion, this system is a tool. It has the ability to help you begin and complete a scrapbook for all of your meaningful & special occasions while saving you time & money and best of all making your life a little easier and less hectic.

You can purchase it here.
I believe it retails for $49.99. At the time of this pre-post she was sold out but don't let that stop you. Click on the link above & check to see if they are back in stock. Becky Higgins expected to have more kits in by the end of January 2011.

This "tool" is HOT!


Monday, February 7, 2011

CRAFTING TIP OF THE WEEK (#75) A good use for Empty Brad Packages

Hello Bloggers!

This week's tip is all about your empty brad packages.

You know the packages that have several wells in them because they often separate the brads by colors or styles?

Look to the right to see the packaging I am referring to----------

When emptied & turned upside down they can become a disposable paint palette.

They can also be used in a shadow box or drawer tray display. You can use strong adhesive to add little trinkets inside of the wells of the packaging and then adhere the entire thing onto chipboard covered in gorgeous paper.

I am sure your crafty minds can come up with more uses, these were just 2 that I have found for them in past projects.
Tune in for tool time Tuesday tomorrow.
Have a wonderful week.

Friday, February 4, 2011

FABULOUS FRIDAY FIND-Stamp Cleaners

Hi!

Today's find is a set of stamp cleaners from Inkadinkado.


The latest in stamp cleaning, these cleaners come in a solvent based ink formula and a water based formula. With a squeeze and a scrub or a spritz from one of Inkadinkado's dual tip stamp cleaners (spray or scrub), your stamps will be squeaky clean. Each bottle has a symbol on the back indicating which formula to use for a specific ink.

The water based cleaner handles cleaning water based inks as well as dye, pigment,embossing,chalk and watermark inks.

The solvent based ink cleaner handles solvent based inks such as: STAZ ON.

This product is an EK Success Brand product so you know your stamps will be in good hands.

The average retail price for these is: $4.99 for 1.96 oz. You can find it at A.C. Moore and other online retailers. You can use a coupon with this as well.

If you want more then baby wipes around for deep cleaning & scrubbing, this might be for you.

Thanks for tuning in today.

Have a great weekend!


Wednesday, February 2, 2011

WHAT I AM UP TO WEDNESDAY-Altered Frame

Today I thought I would share an altered revolving frame that my 11 year old gifted me. She made it herself in wood shop class.

With her permission, (& instruction not to make it too different from its original state) I altered it & now it sits in my craft studio with a picture of her on one side & one of her sister on the other. I always have my girls with me when I am creating.

***********From start to finish*************


************Supplies Used******************
Linen Paint- Folk Art/Plaid
Lace Trim & Felt Flowers w/ Bling- Crafters Square
Circle Bling-Heid Swapp
Flowers-Recollections
Metal Word (Smile)-Making Memories
Butterfly- In my stash (bought at CKC last May)
Paper-Martha Stewart Valentine Holiday Paper Collection
Bling-Bling on a Roll by Recollections