*** GIVEAWAY POST FOR 500 OR MORE FOLLOWERS IS DATED SEPTEMBER 1ST, 2011***

Please leave your comment under the GIVEAWAY post for consideration in the drawing. Once I reach 500 followers I will select a winner! Thank you kindly.

Wednesday, May 11, 2011

*THE WHIMSICAL WEDNESDAY CHALLENGE BLOG * A Tea Cup Card

Hello there fellow bloggers!

Today is Whimsical Wednesday Challenge Day!

The theme for this challenge is to make a shaped card.

I love this challenge and knew immediately what I wanted to do.
Take a look & tell me what you think.Then head over to the Whimsical Wednesday Challenge Blog for details and sneek peeks of the other design team members. They are all so fabulous & fun. You are going to love it!

It is a tea cup card. I free handed the cup on cardstock, cut it out, embossed it, added stickles to the swiss dots and then used foam dots to pop up the one layer on top of the other. I needed the space to be able to insert the tea bag. I used the Cricut Sentimentals cartridge for the door knob cut @ 5".


Here's a close up of the slit where I inserted the tea bag that is attached to the sentimentals door knob. You actually can pull the tea bag right out. The sentiment reads: You're my cup of tea. I printed that off my computer on to the green cardstock.

Kind of difficult to see the stickles on the cup here in the photos but in person you can & it adds such nice dimension.


I totally need another camera! These pics didn't turn out the best but you get a feel for the card nonetheless.


***Supplies Used***
Cream, Green & Black Cardstock Recollections
Swiss Dots Cuttlebug Embossing Folder
Door Know Cut from Sentimentals Cricut Cartridge
Stickles
EK Success scallop edge punch
Pearls-Queen & Co.
Green Lace Trim-Webster's Pages
Black Sequin Trim-Recollections
Stick Pin- In my stash (I think it is old stuff from Creating Keepsakes-it's about time I use it up!)
Black Ribbon-Offray
Tiny Button-In my stash

Tea Bag (From Home)

Now it's your turn to take the challenge on.
Don't be shy...create, enter your creation & see if you win the wonderful candy just waiting to be won.
You have 2 weeks from the time the challenge is announced.

Thank you for stopping by.


Tuesday, May 10, 2011

"TOOL TIME TUESDAY" Copic Airbrush System

Hey there!

Today's tool is the: COPIC AIRBRUSH SYSTEM!


This fantastic system uses your favorite Copic markers to integrate airbrush effects into layouts, illustrations, craft projects, scrapbooking, stamping, and more.

Just insert the broad or medium-broad end of a Copic Original Marker or Sketch Marker (sold separately) into the air grip and hook it up to an air compressor or compressed air can. Changing colors is as easy as switching markers.

The Copic system is environmentally friendly, too; the air can's propellant gas is chlorine-free and non-combustible.

You can find it: HERE .

I have to say this looks pretty cool but don't take my word for it. Check it out in action:


Monday, May 9, 2011

CRAFTING TIP OF THE WEEK (#88) Crimp it!

Hello Everyone & thanks for tuning in today.

Have you got a paper crimper in your tool arsenal?

Do you use it much?

In today's tip I want to share a few ways you can put your paper crimper to use.

One thing I discovered off the bat is that kraft cardstock & your paper crimper can go together like peanut butter & jelly. I know...it may seem odd but there is something about the combo that when you see it together, it makes you go hmmm- me likes!
The combo brings kitsch & vintage together beautifully so that is certainly one thing to do.

2- is to use it to crimp your lightweight chipboard letters & numbers.
3- Use it in your masculine projects.
4- Use it to make textural mats for your photos.
5- Use it when assembling pages for flip books where accordian folds are required. You get a perfect peak & valley with the crimper.

Those are my top 5, now it's your turn to think of some more options for this often underutilized tool.

Have a great week!


Friday, May 6, 2011

FABULOUS FRIDAY FIND-Vintage Ticket Holder

Hi All!

Today's find is brought to you by the wonderful folks @ 7 Gypsies.

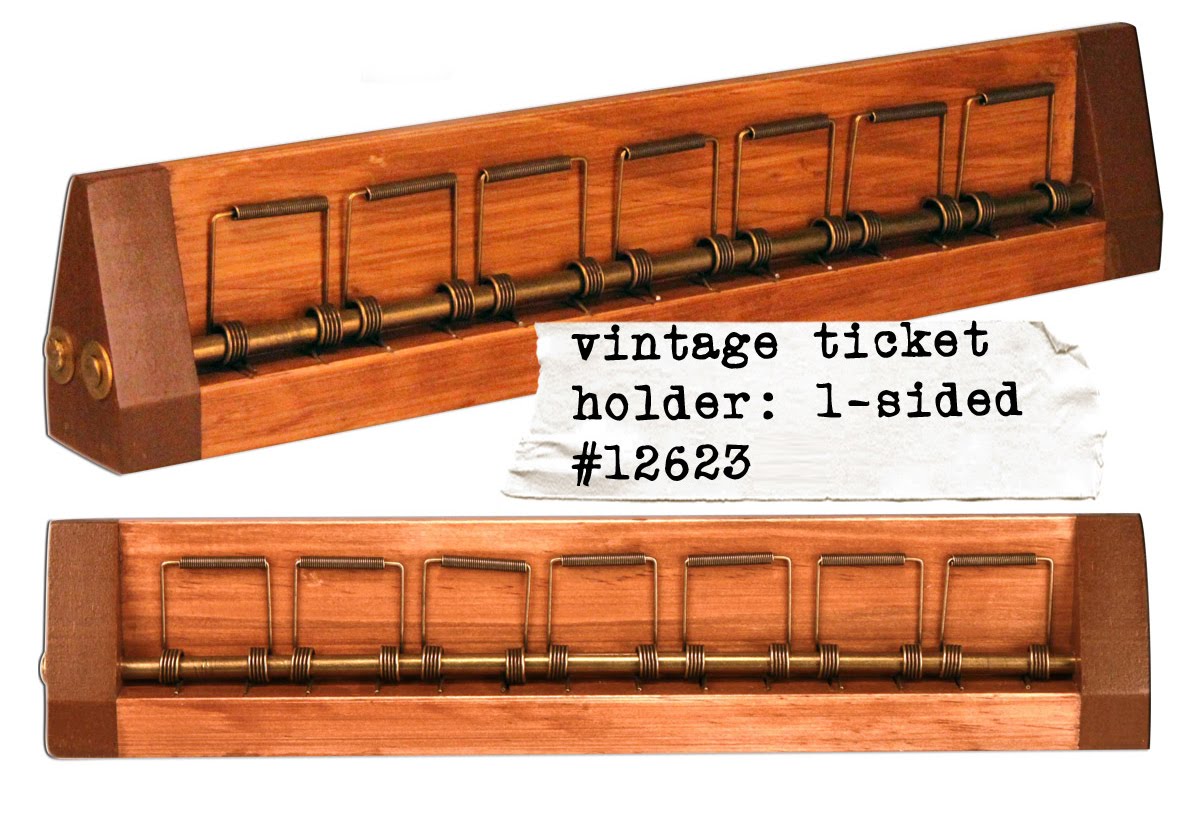
It's the VINTAGE TICKET HOLDER.

Check it out:

Isn't it cool?
What a great piece to display important photos, memorabilia or ATC cards. It's your call but whatever you decide will look just beautiful in it.

The average price I found online was $19.99 which I thought was quite reasonable.

Hope you enjoyed the find for today.
Have a fantastic weekend!


Wednesday, May 4, 2011

*THE WHIMSICAL WEDNESDAY CHALLENGE BLOG *

Happy Wednesday!

It's that time again for you to join us for a Whimsical Wednesday Challenge. The new one will be posted about noon Eastern Standard Time today. It would sure be great to have you participate.

Click HERE to go there!

Have a wonderful day.


Tuesday, May 3, 2011

"TOOL TIME TUESDAY" Misting Mat

Hi there!

Today's tool is a must have for the crafter who loves getting messy!

It's the: MISTING MAT by Tattered Angels.


The one above measures 24"x36" but they also offer one that measures 15"x30".

Its'size is a revelation, no matter which one you get because of how large an area it covers providing you with quite a bit of work surface for inking, chalking, painting, embossing & other crafts requiring a mat. It is also heat resistant and easy to clean.


If interested in purchasing one, click HERE to go to CUSTOM CROPS .


Monday, May 2, 2011

CRAFTING TIP OF THE WEEK (#87) Binding Books without Tools

Happy Monday Bloggers!

Do you ever want to to bind a simple mini album or project without the use of a binding machine? Maybe you don't have access to one or the funds to purchase one...

How about trying something you can access at most stores...
RUBBER CEMENT.

I know, I know...not exactly the most glamorous thing but it is quite functional, inexpensive and can go a long way. I bet you thought I was going to say a silver binding ring & that would work as well.

But, with rubber cement you simply spread it across your edges or areas to bind, use a binder clip to help hold it overnight while it dries after applying the rubber cement and you will have created a tight bond on your project. It dries clear which is a plus too.

Now you must be reasonable when using the rubber cement. It won't exactly hold a 300 page journal together til' the end of time or something that is as thick as a dictionary but it can hold together mini albums, mini journals, mini to do lists and other small projects us crafters like to create & throw in our bags or give as gifts.

Did you know that that is how most sticky note pads are held together? I suppose you could make your own that way too. (Another idea)

Something I thought worth mentioning.

Have a great week!