*** GIVEAWAY POST FOR 500 OR MORE FOLLOWERS IS DATED SEPTEMBER 1ST, 2011***

Please leave your comment under the GIVEAWAY post for consideration in the drawing. Once I reach 500 followers I will select a winner! Thank you kindly.

Monday, October 31, 2011

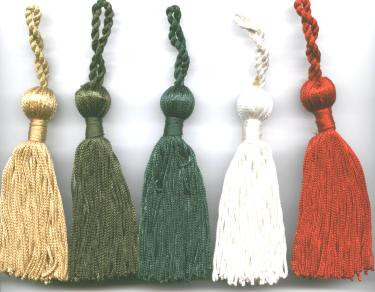
CRAFTING TIP OF THE WEEK (#113) Take it the next level with Tassels

Happy Monday Bloggers!

Today's tip is a quick one. Ever want to take your cards, layouts or home decor to the next level?
How about using small tassels?


They don't have to be just for curtains anymore!
You can use them on bookmarks, tags, mini albums & more. You can easily thread them through binding o-wire or tie them on just about anything. They always add a little flare to curtains so I thought, why not in our other papercrafting & home decor projects.

Hope you give this a try.
Have a good week!


Friday, October 28, 2011

THE WINNER OF THE MY MEMORIES.COM GIVEAWAY IS...

Finally, I can post the winner of the MY MEMORIES.COM giveaway.

It is Liz #6
who said:

Hi Sonia, this is a great giveaway!!! I was surfing the website and they have so many amazing kits!!! I just love the "Christmas Tradtions" Kit. It is gorgeous!!! TY for the giveaway!!!

XoXo,
Liz
decade of scrap.blogspot.com
beautydecade@gmail.com
October 28, 2011 1:40 PM

Congrats Liz!
Thanks to those who entered. I hope you head over & check out My Memories.com & all their fabulous digital software options.

FABULOUS FRIDAY FIND-Color Carrier

Hey Crafty Friends!

Today's find is brought to you by CLEAR SNAP.
It's their: COLOR CARRIER!
The COLOR CARRIER is a nifty device which will hold up to 7 ink pads. It is great for storing your ink pads but also allows you to tow them from place to place quite easily as well.


You can purchase it HERE for a mere $6.95.
While the Clear Snap folks do state it's for use with their Color Box inks I do believe you may be able to squeeze in other inkpads as well.
You may already have a storage solution for your ink pads but this one seems like a great idea even to store a set in your take away caddy for crops & crafty get- togethers.

Hope you enjoyed this find!

Tuesday, October 25, 2011

"TOOL TIME TUESDAY" Foam Adhesive Multi Pack

Hey Crafty Bloggers!

Today's tool is something we crafters should never be caught without!
Any guesses?
It is brought to you by: Imaginisce and some may even say well, it's not really a tool but how could we get our "stuff" to "stick" without it?
So I just threw it into the tool category.
It is their new FOAM ADHESIVE MULTI PACK and the video below will show you what it's all about:


Isn't it totally tool-tastic?

Monday, October 24, 2011

CRAFTING TIP OF THE WEEK (#112) Stamps Overfloweth on my Table

Hello Crafty Bloggers!

So glad you are here.
Today's tip is an idea geared toward your acrylic & rubber stamps. Do you ever find yourself working on a project using several stamps at a time? Do you ever want to just keep them off of your craft table but have them where you can see them & grab them quickly?
Have I got a tip for you.
It's this: use a dry erase board to temporarily store them.


Dry erase boards come in all shapes & sizes so even if you have a very small space to craft in you will still have a place to put your stamps. With dry erase boards you have the luxury of hanging the board or laying it down on your work surface as you craft. There are even some that are magnetic too. Double duty would allow you to also store some of your metal embellishments on it as well.

It is great to have the ability to see what you have & use it. It's also great when you are working on large scale projects that require your stamps be out for a while, to have a temporary holding place.
I don't have to tell you that a dry erase board would be good for so much more in your craft space. From sketches, to notes, to measurements & more.
*** Side note: You can find dry erase boards at the dollar store!***
Hope you give it a try.

Friday, October 21, 2011

FABULOUS FRIDAY FIND-Flower Soft

Hey Fellow Bloggers!

Today's find is : FLOWER SOFT!
It is a unique, soft, small decorative substance which is acid free and can be used to bring dimension to your crafty projects.
The product comes in jars & looks like this:


They offer a variety of solid colors, combinations of color, polar white with glitter, gold, silver and ultra fine versions.
HERE'S A VIDEO OF HOW IT'S USED:


You can find it HERE.

Looks like something fun to add to our crafty stash!
Have a fab weekend!

Wednesday, October 19, 2011

MY MEMORIES.COM & A GIVEAWAY


Hello Crafty Friends~Have I got a post for you today!


The wonderful folks @ MY MEMORIES.COM have offered a special gift for ONE lucky follower of my blog. It is the My Memories Digital Scrapbooking Software!

If you don't know about MY MEMORIES.COM let me fill you in on what you have been missing.

It is a digital scrapbooking software program that offers you so much crafty flexibility. The My Memories Suite is a fun filled, diverse and artfully prepared digital, scrapbooking software program designed to help you succeed at digital crafting in a snap. Their site is easy to navigate, the software is chock full of freebies and the amount of graphics to chose from are over abundant! You can definitely do more than scrapbook pages with this software because it allows for many sizing & styling options. You can print your creations & adhere them to tiles, canvases, coasters, chipboard & more to create your unique, personalized & customized works of art. The program does all the work for you all with the touch of your masterful fingers on the handy dandy computer. So while it is still a computerized work of art, you are using your hands in a different sense to make the magic come to life. By the way, you can use it with PC's &/or MACs.

With this software you can print your own photos or link up & have them printed for you & mailed right to your door step. You can use their designs or start from scratch. You can share your creations with others & more.


I got warmed up by making a quick page using the My Memories Digital Scrapbooking Software.

I was able to customize the page with the photo & text you see just with a touch of a few key strokes. I also changed the color photo to a sepia toned & tried another feature to size the photo to fit in the circle and make it seem like you were looking into a ship's porthole window. I enjoyed the ability to customize. I did all that on my first try!

Once I finished that I decided to try another quick page but this time I printed it out on photo paper, adhered it to chocolate cardstock, used a corner rounder, inked up the edges on both the photo & the cardstock. I then used a little Tim Holtz crackle paint in rock candy, let it dry. Then mounted the digital printout onto a mouse pad base & laminated it together. After, I adhered a pom,pom ribbon around the outside edge. That ribbon edging actually helps the mouse to stay on the pad by creating a mini barrier. Remember to use strong adhesive that will work on laminated surfaces if you try this.

Check it out below:

Here it is before I added the pom-pom border & with a computer mouse sitting on it


Here it is all finished:

You can find this quick page design HERE FOR FREE. It is called the Togetherness Quick Page.
*********************************************************

NOW FOR THE GIVEAWAY INSTRUCTIONS:

1- VISIT MY MEMORIES.COM.

2- BROWSE THE SITE THEN COME BACK TO MY BLOG & TELL ME WHAT DIGITAL PAPER PACK WAS YOUR FAVORITE.

3- SHARE THE NEWS BY COPYING & PASTING THE MY MEMORIES.COM BUTTON ON YOUR BLOG.

*DON'T FORGET TO LEAVE ME A WAY TO CONTACT YOU*

THAT'S IT!
The GIVEAWAY IS OPEN TO EVERY CRAFTER EVERYWHERE IN THE U.S. & CANADA!

I will draw the winner on Friday, October 28th @ 6pm Eastern Standard Time using Random.org.

*As a little extra something special, the sweet staff of My Memories. com has given me a special code to share with you. This code provides a $10 discount off the purchase of the My Memories Suite Scrapbook V2 Software & a $10 coupon for the My Memories.com store-a $20 value. *

The Code is: STMMM538452

Below is a video provided by the My Memories.com staff giving you an overview of the software.

New to MyMemories Suite? Let's Get Started! from Lisa Jurrens on Vimeo.

Thank you so much for spending time with me. I hope you enjoyed the projects & dare to give the MY MEMORIES.COM DIGITAL SOFTWARE a try!

I look forward to sharing the digital album I am working on but that will be in another post. I have to finish it first.
Hope you enjoyed! I look forward to your entry.

Tuesday, October 18, 2011

"TOOL TIME TUESDAY" Puzzle Maker Punch

Hello There Crafty Friends!
Today's tool is the PUZZLE MAKER PUNCH.


You can make your own puzzles! You simply adhere your picture or art to the 4"x6 adhesive sheets and punch away!

You can find it HERE as part of a set for $17.49.
The set comes with the punch and 10 adhesive 4"x6" sheets.

You can make invitations, cards, put the puzzle pieces in a precious little gift box & give them as party favors. The possibilities for this are limited only by your imagination.
I enjoyed the uniqueness of this punch.
Hope you liked it too!
Thanks for tuning in.

Monday, October 17, 2011

CRAFTING TIP OF THE WEEK (#111) Another Ribbon Storage Idea

Welcome Crafters!
So glad you stopped in for a visit.
Today's tip is just me sharing with you a different way to store ribbon that you really love, right @ your fingertips in a unique way.

Ever see those bracelet display stands? They actually carry them at Michael's. And yes, they are for storing or displaying bracelets but I though why not use them to store your favorite ribbons that you want to keep within arms reach for your crafting.
They look like this:

I can imagine rolling the ribbon around it to fit then using pretty decorative stick pins or push pins to hold the ribbons in place. Of course, since the surface of the display can handle stick pins, push pins & other pokey things you may be able to use it to store those as well.
I am sure they would look really pretty. Also, the bracelet stand would not take up too much surface space on your crafting table.

Hope you enjoyed this week's tip.
Have a wonderful week ahead.

Friday, October 14, 2011

FABULOUS FRIDAY FIND-Kaleidoscope Collections Kreator 3

HAPPY FRIDAY FELLOW BLOGGERS!
Today's find is the: KALEIDOSCOPE COLLECTIONS KREATOR 3 CD!


This innovative, simple and unique crafting CD gives you creative options that you might not have thought about.By simply using any digital image or photo you can make a stunning uniquely personal kaleidoscope.

You can then use what you create with the kaleidoscope effect in all of your crafty projects.
HERE IT IS FEATURED ON SCRAPBOOK MEMORIES TV SHOW:


Making kaleidoscope designs has never been so easy or so much fun! Kaleidoscope Kreator 3 was redesigned from the ground up to make it faster and easier to use and packed with features that fans of the original Kaleidoscope have been asking for. Features include: over sixty-five standard shapes; custom print features that allow you to print multiple copies of your kaleidoscope; the ability to make poster prints and even print each wedge separately.

Isn't it cool?
Hope you enjoyed it!

Tuesday, October 11, 2011

"TOOL TIME TUESDAY"Spectrum Noir Pens

Hey Bloggers!

For today's tool I thought I would go outside the box a bit. I am not certain if you will agree these can be tools but I thought that they really work hard for us to bring color, life & depth to our stamped & digital images so I am introducing them to you as today's tool.

They are: SPECTRUM NOIR PENS!
These beauties come in an array of colors & sets. They are reasonably priced, blend well, are refillable and have both a fine point & chisel point. They are comparable to Copics in every sense of the word without the price tag.
You can purchase a set of 6 for $11.95. I will have the link below after you have had the opportunity to see the full details.
Check out the video below by Crafter's Companion:


You can purchase them HERE @ PAPER WISHES ONLINE CATALOG.
Hope you enjoyed today's tool.
Have a good day.

Monday, October 10, 2011

CRAFTING TIP OF THE WEEK (#110) Inking Tool & FELT

Hello Fellow Bloggers!

If you ever find yourself needing to replace your felt squares for your Tim Holtz inking tool, just purchase a sheet of felt.

Michael's, Joann's & A.C. Moore all sell them individually & in packs. The singles usually run for approximately anywhere from .25 cents-.39 cents a sheet. The non adhesive backed felt will grab on to the existing velcro on the Tim Holtz inking tool just fine. Adhesive backed felt is available for purchase as well but not required when replacing your existing felt pads for the inking tool.

You can cut up the sheet which is usually an 8 1/2x 11 or 9x12 size sheet and get a lot of felt replacement pads out of one sheet. By the way, you can also find rolls of it at the fabric stores. So it is widely available, inexpensive & you get a lot for a little money.
It comes in a variety of colors but white would be the best choice so you can always see the ink colors & where you apply it.

Hope this was helpful.

Saturday, October 8, 2011

AN AUTUMN PAPER CONE

Another share...
It's an autumnal paper cone.

I think I will make a batch of these to give to our Thanksgiving guests @ the dinner table. I will fill them with something delectable.

Take a peek & let me know what you think.

There is so much dimension to this little gem. I had a fun time putting it together. My paper was from a Target Fall paper pack that I purchased last year. It was not double sided so I just adhered 2 pieces that I liked together & made it 2 sided. I used pearls, floral sprays & purple beads, bling, the MS butterfly punch for the butterflies & some monochromatic twine I had in my stash for the top rim of the cone. I had that ribbon in my stash & used 2 purple flower shaped eyelets. I adore how this came out. It looks ever so much nicer in person.

Goodnight!

So glad you came to spend a little time with me.

A HALLOWEEN PLACE SETTING

Well Hello Crafty Friends!

I am sharing a Halloween Place Setting that will be set for my daughter's ghostly guests on our dining room table.
She is hosting a Halloween party & having her ghoulish girlfriends sitting around the table ready for a seance to beckon those from another realm. I am hoping the place setting inspires their "special powers".

Full Ensemble of Handcrafted Items Includes:
Place Mat (adhered to 12x12 chipboard then to fabric placemat)
Paper Pumpkin
Name Card
Napking RingHere's a close up of the Napkin Ring:

A Close Up of the Name Card:


Here's to hoping her party is a smashing success!
Thanks for visiting.

Friday, October 7, 2011

FABULOUS FRIDAY FIND-Pockets

Hello!
So glad you stopped in.

Today's find is
KI Memories', POCKETS!


These pockets are designed with accordion-folded sides to hold even thick or bulky items with ease. Perfect for scrapbooking, cardmaking, and more! They carry assorted sizes and different colors, patterns & styles.
You can purchase them HERE where they are currently on sale and you can find quite the assortment.

Have a great weekend!

Thursday, October 6, 2011

DON'T FORGET...

The "My Craft Channel" is finally up & running!

Click on my title link & it will take you there NOW.

They have craft tv, daily specials, a blog & more.

Check it out!

Wednesday, October 5, 2011

A HALLOWEEN GOODY POUCH

Hey Crafty Friends!

With Halloween soon upon us I have spent a little time making some goodies.
Here's a little Halloween Goody Pouch I made using the DCWV-Midnight Spell Cardstock:


I kept the decorating simple. But if you were having an adult Halloween party & wanted to snazz these up with bling, crystals & ribbon I am sure it would work for grown ups just as well as for the kids. I used sweet treats but you can easily insert a gift card, a lottery ticket or movie stub.

Have a wonderful Wednesday!


Tuesday, October 4, 2011

BONUS TOOL SEGMENT-Crop-A-Dile & Crop-A-Dile II (Big Bite)

Hello Again!

I received an e-mail from one of my blog followers, Georgie inquiring about the Crop-A-Dile & the Big Bite.
I thought I would find 2 videos that best highlight these 2 fabulous tools to help her gain some insight as to their functionality.
There are some crafters out there who do NOT own these tools and I am certain it is helpful when those of us who do can share what we learn, what we find & our success stories.

THE CROP-A- DILE (ORIGINAL VERSION)


THE CROP-A-DILE-BIG BITE (VERSION 2)


You can purchase either model HERE.
Or if you see them at your local craft store you can pick it up there. Michael's, Joann's & A.C. Moore do allow you to use coupons on these items so long as they are not already on sale.
You cannot go wrong with either one, in my humble opinion.
Great investment!

Hope this helped Georgie & others on the fence or just not in the know.


"TOOL TIME TUESDAY" The i-Punch

Hello Crafty Friends!

Today's tool of choice is brought to you by IMAGINISCE & it is the: i punch !
It looks like this:


This one handy tool can punch up to 6 different sized holes.
It costs $12.99 and can be found online as well as most Michael's stores. When not on sale you can use your coupon.

To use it you simply, choose a size, give it a squeeze, and punch through your desired medium. It works on leather, chipboard or multiple sheets of cardstock. This tool punches the following sizes: 2 mm, 2.5 mm, 3 mm, 3.5 mm, 4 mm and 6 mm.

Check out the demonstration:


Monday, October 3, 2011

CRAFTING TIP OF THE WEEK (#109) Adding Color to Metallics

Happy Monday Blog Friends & Followers!

Today's tip is a quick tip.
Want to add color to your silver or white brads, staples, eyelets &/or other metallic embellishments?

Try using Alcohol Inks. This includes Copic Markers! Just heat set with your heat tool after coloring, making sure not to touch them because metal embellishments get hot.
You can also just let them dry overnight.
Hope you give it a try!


Sunday, October 2, 2011

A PAPER PUMPKIN

Hello Crafty Friends!

Just wanted to share this adorable little paper pumpkin I made.


It will be part of a place setting ensemble I will be making to use as home decor.
I used cardstock from the DCWV's-Midnight Spell Line then I used Bazzill swiss dot black cardstock for the topper, a flower, a brad, bling & some leaves. It came together rather quickly. Double sided paper will work beautifully because as you can tell by the photo you will be able to see the inside a bit. Wish I would have grabbed double sided but...oh well.

In case you want to make your own you only need to cut 7 strips of 4 1/4"x 1 1/2" strips of cardstock. Make a hole in the bottom center of all the strips, thread a brad through & layer all your strips one on top of the other while gathering them into the pumpkin shape up on top. You will need a strong adhesive to adhere each strip on top of the other. Your pumpkin top will not completely close but don't be alarmed. You can either cover it up like I did or insert a small cellophane baggie with treats & decorate as you wish.

Stay tuned for the rest of the ensemble.
Hope you liked my paper pumpkin & could glean some ideas for your Halloween holiday fun!


Saturday, October 1, 2011

SIMPLE SATURDAY -CARD DAY

Hello Crafty Bloggers!

Just thought I would share this simple, elegant card I put together.


I left the inside blank so I could write my own personal message as I often like to do with thinking of you cards.

I just had to throw in another flower on the back.

*Side Note* I usually mail cards with any kind of dimension &/or flowers in a CD mailing box instead of your traditional envelope. I wrap it in tissue paper, slide it in the box & off it goes.

Have a great day!