*** GIVEAWAY POST FOR 500 OR MORE FOLLOWERS IS DATED SEPTEMBER 1ST, 2011***

Please leave your comment under the GIVEAWAY post for consideration in the drawing. Once I reach 500 followers I will select a winner! Thank you kindly.

Monday, September 16, 2013


Hello Friends!

I'm back & for my first post  I am excited to share some projects that I made in honor of :
                                         " 100 DAYS OF TOMBOW ".


ATLANTA – July 15, 2013 – For its centennial year, Tombow created the “100 Days of Tombow” program designed to promote and support arts education and quality art programs nationwide by showcasing the talents of crafters throughout North America and providing an in kind gift valued at up to $10,000 of Tombow art products to the Council for Arts Education, a national nonprofit promoting and supporting arts education. 

The kind folks at TOMBOW sent me some terrific Tombow goodies to work with and it was so much fun to craft for such a great cause. I can't think of a better reason to craft then to contribute to special causes. The range is vast from creating for family to creating for fundraising, awareness & contributions. It's all part of a great movement where crafting has certainly made a difference. 
That being said- 
*Every submission for the “100 Days of Tombow” blogging program will result in a $100.00 product donation to the Council for Arts Education.*

Could it get any sweeter? 

Without further ado, here are my creations:

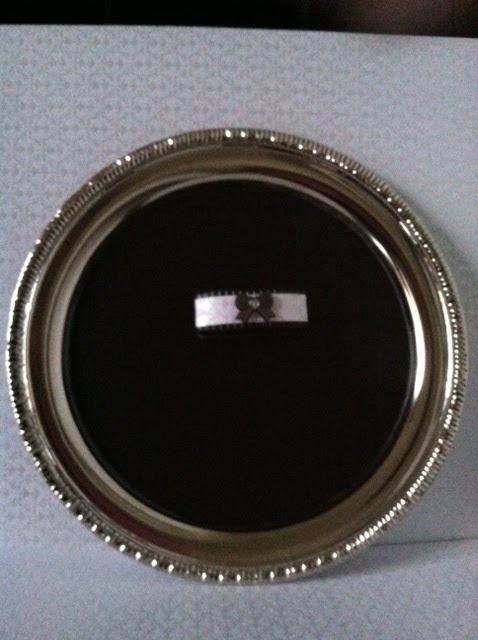
                 WEDDING PHOTO DISPLAY TRAY


This display tray has a binder clip mechanism by Tim Holtz in the center that will hold lots of 4x6 photos. The bride & groom squares will hold a picture of my daughter & son in law separately on wedding day & then the center square with the "B" monogram will hold a photo of the 2 of them after taking their vows. I am gifting this to my daughter's in laws. I'm still waiting on the wedding pics to arrive so they are not in there yet but I hope after explaining it you get a better idea of how this display piece will work.

 I used several Tombow adhesives including the : Stamp Runner Adhesive , Tombow Permanent Mono Multi Glue & Tombow Power Tabs (very strong stuff). 


                        HOME DECOR  TABLE DISPLAY
                                       

Using Tombow's incredible IROJITEN colored pencils in the deep tones I created the display above.  The pencils come in the gorgeous box below and in the richest warm tones. This color family would be  fantastic for all your fall projects. 


MINI CANVASES  


Aren't they "Tombow Tweet"?
(I know...cheesy but I could not resist)

Using the Tombow-Groovy Collection of colored markers I was able to make those adorable mini canvases. The markers are so vibrant & as you can see they really pop! It made coloring my stamped images so simple. The ink on these markers is sumptuous and really gives off a nice stamped impression.  I definitely plan on getting all the color families.

        
                   So there you have it friends! 

My time spent creating with Tombow products was delightful. They have superior products that really perform well. It was my first time using their IROJITEN colored pencil collection and the Craft Markers. I can tell you now it won't be the last!

                     Thank you Tombow!

I hope you all follow Tombow's blog & their journey of 100 Days of Tombow. They really care for the crafting community & BEYOND.  One need look no further then this event to see how important it is to Tombow to take time to create, share & help make the world a better place one pretty art piece at a time. Whether it be coloring with their pencils, inking up with their markers or gluing with their adhesives- they know the true value of art lies in being able to create it. If you have the products then your imagination can carry you the rest of the way. By their contribution, they are providing the product and the recipients will make the magic that is ART!

Thursday, September 12, 2013

BLOG WILL BE UNDER CONSTRUCTION but I will be blogging & sharing...


HELLO MY DEAR CRAFTY FRIENDS, FOLLOWERS & PASSERS- BY!

MY BLOG WILL BE UNDERGOING CONSTRUCTION. 

I WILL BE POSTING AGAIN BEGINNING NEXT WEEK. IT WILL BE GREAT TO HAVE YOU DROP IN.


YOU'RE ALL A DEAR BUNCH & I AM SO THRILLED TO BE WORKING ON GETTING BACK TO SHARING & INTERACTING WITH YOU. 

AS OF NOW, I'M NOT CERTAIN THAT I WILL CONTINUE THE SAME FORMAT OF HAVING THE CRAFTING TIP OF THE WEEK, TOOL TIME TUESDAY, ETC...

I DO HOWEVER, INTEND TO POST MORE PICS OF PROJECTS.

THANK YOU ALL VERY KINDLY FOR  YOUR FRIENDSHIP & FOR CONTINUING TO SUPPORT ME EVEN IN MY ABSENCE. 


Sunday, April 7, 2013

Blog Break


Hello Blog Friends!

This week I am taking a short posting break from my blog's regularly scheduled segments to work on some items for my daughter's wedding and to pursue some household projects as well. 

I still have to catch up with my dear blog friends & followers by visiting & commenting as well. 

Please forgive my delay. 

Although I have been busy & also did some traveling I still feel bad that I have taken so long to get back to you kind, sweet souls. 

Thank you all so very much for popping over to visit my blog & for leaving me so much love. 

It means so much to me!

You are all incredibly talented and thoughtful  crafters with such big hearts.

Your support & following truly are inspiring and propel me to want to continue blogging. 

I honestly appreciate you all!


Friday, April 5, 2013

Fabulous Friday Find- Melissa Frances Mini Hangers


Happy Friday Crafty Friends!

Today's find is a couple of lovely vintage mini hangers by Melissa Frances. 

Check them out:


These adorable mini hangers are wonderful to display everything from photos to tags, postcards, altered art, mini quilts and more. 

Melissa Frances offers them in 2 sizes, 4" & 6" and in this gorgeous vintage style. They appear to vary in price anywhere from $3.99 USD to $7.99 USD depending on size & retailer. 

They can be found via some online retailers or your specialty paper crafting stores. I have not spot them out at any of the local hobby & craft stores just yet. 

I thought these were not only beautiful but practical pieces that could easily morph into any style because of their elegant simplicity. 

Hope you like this find as much as I do. 

Have a great weekend!

Thursday, April 4, 2013

A Napkin Ring


Hey there!

So I'm back with another crafty creation. 

This time it's a napkin ring I made for my daughter's bridal shower. 

Well, truth be told I made many...50 to be exact but only photographed the ones shown. 

I thought it really added to the ambience of the table setting. 

Take a peek: 


Hope you come back to see more. 

Wednesday, April 3, 2013

A Card Box for the Bridal Shower


Hello Crafters!

I have been busy preparing for my daughter's bridal shower & wedding. 

Now that the shower has passed I can share a few things I made. 

Today I am sharing the Card Box. 

Her shower was loosely based on the movie "Breakfast at Tiffany's" so I incorporated that into some of the things I made for her shower. 

Check it out: 

So what do you guys think? 


Tuesday, April 2, 2013

Tool Time Tuesday- Spellbinders Artisan X-plorer Machine


Hello there!

Thanks for tuning in today. 

The tool I'm pleased to share with you today is the brand new Artisan X-plorer by Spellbinders. It's a manual die cutting machine that actually is very strong and can cut metal! It's industrial strength and can emboss as well as cut giving you great texture possibilities.

They also have made accompanying metal pieces that can work in conjunction with the X-plorer. 

Check out the video below from the Spellbinder ladies: 


Imagine the crossover potential of this machine. 

Check out this other video from the Craft Test Dummies: 


Not sure if you caught what Sarah said but this machine is going to retail for $89.99 USD.

Love the little project she demoed for us.

What a cool tool!


Monday, April 1, 2013

Crafting Tip of the Week #174- Stamp Clean Up


Hi Bloggers!

Today's tip offers a way to help clean off your acrylic, foam or rubber stamps. 

There are all kinds of ways like baby wipes, scrubber pads, wash cloths, running them under water and  stamp cleaner spritz options on the market as well. 

That's all fine & good and I actually use some of the mentioned methods and still do. This tip is not to take away from those options, only to add another.

 One of the things I mentioned above was scrubber pads. 

I have found that I can buy more and save by purchasing "PAINT PADS"  at my local home improvement store which provide the same cleaning action as the scrubber pads. 

If you're wondering , the paint pads look like this: 


They are actually more inexpensive to buy then getting the stamp scrubber pad at the craft stores and work the same way. 

It's just another method to use. 

So if you're in a pinch or find you have these lying around your house from an old paint project you may want to give these a try. 

In this beloved hobby we share that is one thing there is never a shortage of...options.

Have a great week!

Friday, March 29, 2013

Fabulous Friday Find- Printable Film

Good Day Crafty Friends!

Thanks for stopping in today to check out the find.

Today's find is brought to you by Craft Attitude & it is their Printable Film recently debuted at Winter CHA 2013.

The product is an inkjet printable film that can be applied to projects of all kinds.  It comes in packages of 8 sheets and retails for $16.99 USD. They offer categories of the film for wood, fabric, magnets, jewelry & other materials but the material itself is the same. They package it differently so the consumer can see its versatility.

Check out the video below:


Pretty interesting stuff right?
Imagine all you can do with this!

Have a great weekend!

Tuesday, March 26, 2013

Tool Time Tuesday- The New Sizzix Big Shot & Bonus...


Yes crafty friends, another Big Shot from Sizzix.  They also have come out with new dies designed by the lovely Stephanie.

It's all so darling but check it out in the video below for yourself:


The machine itself is great but that Flip it Card die is simply terrific!

Love the technique she shared as well. 

And the tools just keep on coming so come back next week!

Have a great day.

Monday, March 25, 2013

Crafting Tip of the Week#173- Downy or Snuggle Anyone?


Hey Crafty Friends!

Yes, I am talking laundry stuff again but this time it's about fabric softener. 

It's today's quick tip and I think you may just love it. I know I do. 

So I am a big fan of fabric softener and to that end I decided that since I use lots of it for not only laundry but to help  remove wall paper from my home (oh yes I did & yes it worked). Well, I recommended to our painter to use it to remove the wall paper. So in actuality he removed the wall paper not me, just to clarify.  He thought I was nuts but in all his years as a painter he said it worked better then the solutions he purchased at home improvement stores. And it was less expensive then those solutions too.  Now I cannot take credit for that as I saw it on an episode of an HGTV show years ago. Just making sure to give credit where credit is due. 

But...as far as crafting goes, I found another use for FABRIC SOFTENER my friends & here it is: 
to clean paint off your paint brushes!

Simply soak your brushes in for 10 minutes  and it cleans right off! 

It just breaks down the paint fibers attached to the brush fibers so well and BONUS...your brushes smell great. I remembered how well it broke down the fibers of that old wall paper in my home & thought what if it can do the same for my paint brushes? So I tried it and it worked. 


Who knew?


Friday, March 22, 2013

Fabulous Friday Find- The Jenni Bowlin Collection of Winter CHA 2013


Boy oh boy crafters are you in for a treat. 

Jenni Bowlin was busy working out this terrific line of beauties. 

Check out the 2 videos below of her newly released products :


So clever, cute & charming!

The simple vintage touches offer up a great way to create so much and also mix her items with other lines beautifully. 


Hope you enjoyed her collection as much as I did.

Have a wonderful weekend.


Tuesday, March 19, 2013

Tool Time Tuesday- Quickutz Evolution


Hey Crafters!

As if there aren't enough tools out there right? 

But this Letterpress & Die Cutting machine has had some overhaul done to it which makes it better then its' predecessor, the Epic Letterpress machine. 

Check it out:


So many tools...so little time!

Tune in next week for another newbie for 2013!

Thanks for stopping by.

Monday, March 18, 2013

Crafting Tip of the Week#172- Caps as Cups?


Hello crafters!

Yes, I know...curious title right?
I do try to get your attention, can't blame a girl for trying.

This one is all about using your "laundry detergent caps as cups".

You know the ones, they look like this: (But not the ones with the spout in the center)


I simply use them as vessels for mixing paint or pouring in inks, gesso, gel medium, etc...I think you get the idea. They have a small footprint making it easy to set it aside on my work space & it will stay in place. I also appreciate the high wall giving you plenty of space to fill the cap as you would a cup.

You can pour your medium of choice in gradually & in increments. I always like to start with a little & add more as I need to. It saves from waste and has helped me avoid spills. My smaller / shorter paint brushes and foam brushes fit inside well and can actually stand in the caps too.

It's yet another way to craft-cycle everyday items around the house that you would otherwise discard. 


P.S. Is it crazy that as I was finishing the post I thought of another tip for these?
I'll share it just in case you're wondering- even though I have not tried it myself. What if...

You took a bunch of these and lined the inside of a kitchen or cabinet drawer from end to end and used them to store stuff? ( I suppose you could adhere them/connect them with a strong adhesive like E6000).

You know...like brads, clips, buttons (oh...using the coordinating color of cap to indicate the color of whatever button is inside)...the hamster wheel in my head is spinning!

I am sure you can think of more ways to put these functional caps new life in your craft space or around the house by recycling.

Thanks for tuning in. 


Sunday, March 17, 2013

I Made Something, Wan't to See?


Hello Crafty Friends!

I wanted to post some pics of these metal chalkboards I made for my daughter's upcoming wedding reception. 

I also embellished the little magnetic erasers that you see on the chalkboard.  My daughter plans on having these at the photo booth for guests to write them wedding messages & pose with in the photo booth. I thought it was a great idea! As always, I am happy to oblige.


I have been making things for her shower too but can't show those as her shower is next week. That reminds me, I should be taking pics of those before I take them to the shower that way I can share them with you!

Hope to be crafting more & sharing them here with you all real soon.

Thanks for tuning in.
Have a terrific week ahead!


Friday, March 15, 2013

Fabulous Friday Find- Tim Holtz Distress Paints


Really, need I say more? 

Check out the video below as the King of Crafts shows us all about it: 


Oh...isn't he...oops...aren't the paints dreamy? 

Those colors are so rich and love how you can use them on all kinds of surfaces. And once they dry they are waterproof. 

Gotta love it!


Tuesday, March 12, 2013

Tool Time Tuesday- Tim Holtz Alterations Sizzix Die Cuts


Hello Crafters! 
Yes, I am sharing Tim Holtz latest Alterations Die Cuts by Sizzix that he debuted at Winter CHA 2013 by way of the awesome Noell Hyman of Paperclipping.com.

These fantastic die cuts are so innovative and dynamic. They are most definitely useful tools for any crafter's arsenal.


Check out her video below:


Aren't these wonderful? 
That picture wheel is to "die" for!!!!

How in the world will we ever afford all this stuff? 

I am well aware that it is easy to love & covet all of Tim Holtz's goodies, I think I need a part time job just for craft goodies!

Oh well, no harm in looking right?  Just add to your wish list on the Tim Holtz App, drop hints to your loved ones and maybe some of these lovelies will magically appear. 

Hope you enjoyed. 

C-ya back here next time-thanks for coming!

Monday, March 11, 2013

Crafting Tip of the Week#171- Paper Piercing Perfection


...yes, paper piercing perfection crafters. It's over-rated the art of piercing right? Well, not really but sometimes getting it right can be as much of pain as stabbing your finger with the piercing tool.

For today's tip I hope to take the stigma out of it for you so you can reach paper piercing perfection in 2 easy steps.

Ready...here goes: 

1- USE FOAM AS YOUR BASE UNDER YOUR PIERCING MEDIUM. Whether it's paper, plastic, fabric, vinyl the FOAM will be of great help.

The foam provides a great barrier between your fingers and of course your actual crafting surface. You should still use a cutting mat but you will get one with a lot less scratches, raised bumps or tiny holes from your piercer. It also allows for steady, controlled insertion & removal of your piercing tool for more even and uniformed stitched holes.


You can purchase  inexpensive fun foam you can find at arts & crafts stores, Walmarts and/or Targets and keep it on hand.

2-GRAB A HOLD OF ONE OF THESE: 


THEY ARE PLASTIC NEEDLEPOINT CANVAS MESH.  These will help give you even, straight & perfectly aligned piercing holes every time. Any of these will work for random piercing. If you are looking to pierce those shapes specific to the canvas mesh,  they will be of greater assistance then.

Best thing is you can pierce that same shape in many sizes by simple selection. You can use a pencil, pen or marker in place of the piercer first to draft your shape. The closer to the center of the canvas mesh you are the smaller your shape will be. You can remove the mesh, review the "draft" then if you are happy with it-proceed to piercing. ( OR...leave as is)
You must use the PLASTIC MESH. It provides a little more stability & rigidity than the other ones on market. I believe there are ones of varying materials like raw canvas, burlap & materials.
The plastic ones are lightweight but have more stability within each of its' tiny "walls". Not to mention they are easy to store & work with as well.

These can be found in craft stores like Joann's, Michael's, A.C. Moore &  Hobby Lobby but I am not sure about Walmart & Target. I know they have them online as well at Consumer Crafts.

Both the foam & the canvas mesh are relatively inexpensive averaging from .29 cents & up (U.S.) for one sheet of foam to .59 cents & up (U.S.) for the canvas mesh. Pricing varies depending on retailer & size you select of the product.

Personally, I think they are a relatively inexpensive solution to  sometimes pesky problems with piercing. Two well known ones being the proverbial accidental pricking of the finger and misalignment.

If you are plagued with the same piercing dilemmas give this tip a try.
*Painless Paper Piercing Recipe*
1-Cutting Mat
2-Fun Foam
3-Plastic Canvas Mesh

Until next time,

Friday, March 8, 2013

Fabulous Friday Find- Webster's Pages Modern Romance Collection


Happy Friday All!

Today's find is brought to you by Webster's Pages & it's their Modern Romance Collection.

Check out all the goodies: 


Isn't this collection divine? 

I simply adore Webster's Pages. I love how this line covers everything. It is versatile enough to use for all occasions. I also appreciate how they offer "quick picks" for $1. 

What do you think? Have you had a chance to see this collection newly released during Winter CHA 2013?

Glad you stopped by today and hope you enjoyed the little sneak peek.
Have a wonderful weekend!


Tuesday, March 5, 2013

Tool Time Tuesday- E6000 Spray Adhesive


Yes crafty friends, you read that right!

It's E6000 spray adhesive. If you already use & love the E6000 gel adhesive tube you know how truly strong and reliable it is. And so when I saw in my research that the fantastic folks of E6000 were offering it in a spray medium I just flipped. 

Adhesive for us crafters is such an important thing that I view it as a tool so that is why I decided to feature it as this week's tool.

This new version of E6000 adhesive has no odor, the same strong adhesion factor & the ability to be cleaned up with water.  It works on paper, plastic, wood, foam and many other materials. 

Check out the video shared by Craft Test Dummies: 


E6000 spray adhesive is going to be released for retail purchase really soon and will start at $8.99 USD retail price & up for 8 ounces depending on the retailer and region. 

I already use the gel but can see myself using this amazing method of adhesive delivery as well. 

How about you?